
Hello:
Here is a quick tutorial on how to Multicast Stream to 1 or more BrightSign players on a network using OBS (Open Broadcaster Software). This is meant as a starting point, you may need to adjust settings for your setup based on needs.
OBS is a popular open source software for video recording and live streaming.
There are advantages and disadvantages to using a Multicast video stream. The benefit is that you only have to do one video stream out on the network, and the bandwidth on the network is the same regardless if you have 1 or many players listening. The disadvantages are that there is no error correcting for any missed data, and may have issues with some Managed Network Switches (talk to your IT folks if you are on a corporate network, they should be able to help you out - Just tell them you need to do a UDP Multicast to all of your BrightSign players).
You can use this to stream content from a PC, for example a Desktop view of a piece of software with manufacturing information, or the output of an attached video capture card, or attached television tuner, a local video file, a view of security cameras, etc. Pretty much any video you can watch on your computer, you can stream to BrightSign with OBS.
Download OBS Studio (Windows, macOS 10.11+, and Linux) and install.
Then go to File> Settings
In the Settings Window, select the Video Icon on the side:

You want to set the Base Canvas to the resolution of 1920x1080 (or a different resolution if you are doing a different zone size, or a specific source resolution.
The Output Resolution should be set to the resolution of your Zone Size on your BrightSign player (1920x1080 if you are going Full Screen).
The Downscale Filter settings depend on if you are resealing video, the default value should be fine in most cases.
The Frame Rate with a Common FPS Value of 30 should be fine in most cases.
Click on the Apply button at the bottom of the Window.
Then select the Output Icon on the side:

Then at the top for Output Mode, select Advanced.
Then go to the Recording tab.
Change Type to Custom Output (FFmpeg)
Change FFmpeg Output Type to Output to URL
Change File Path or URL to udp://239.0.0.1:9999?pkt_size=1316
The IP is a Multicast IP, the 239.0.0.1 value should be fine in most cases unless something else is already multicasting using that IP address. Some IT people like to use a matching multicast IP for the pc for clarity, so for example if the IP address of the pc you have OBS on is 192.168.10.108, then you would use the multicast IP 239.168.10.108, or again consult with your IT people.
Change Container Format to mpegts
Change Video Bitrate to 2000
This is a happy medium, you can increase or decrease based on content.
Change Keyframe interval (frames) to 60
This has the keyframe updating every 2 seconds which should be fine for most content.
Rescale Output - you probably don't need to turn this on in most cases, but should be self explanatory if you need it.
Change Video Encoder to libx264 (Default Encoder)
The Default Encoder uses the CPU, if you have a GPU video card you may have other options that use the GPU. For example with an Nvidia video card, you might also see in the list something like nvenc (libx264), which uses the GPU and libx264 instead of the CPU to encode the video stream.
Change Audio Bitrate to 96
You can change the Audio Bitrate higher or lower based on your needs, but 96 is fine in most cases.
Audio Encoder change to aac (Default Encoder)
Click the Apply button at the bottom of the Window, and then the OK button.
Now you are back to the Main OBS Screen:

Near the Bottom Right, click on the Studio Mode button so you show the 2 side by side views.
Then on the bottom left you will see a Sources box, click on the + at the bottom to add a new source.
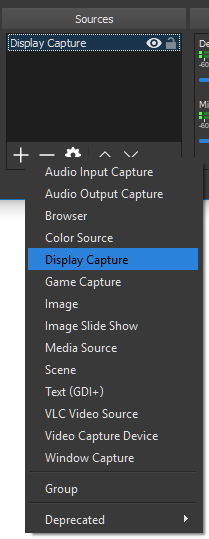
Here you can select the source you want to display, in this case Display Capture, which will show what is on your PC Screen.
If you want to switch between different sources, then use the Scene box to the left of this box to create a new scene, and then set up the source for that scene the same way.
Click on the Transition Button in the middle of the 2 screen views to transition to the Scene you have selected.
Then to start the stream, click on the Start Recording button on the Bottom Right of the window. I know, this is a bit confusing, but OBS doesn't have the Streaming setup for streaming via FFmpeg, so that is why we are using the Recording mode to do this.
Then in BrightAuthor, set up your zone and add a Video Stream event to that zone:
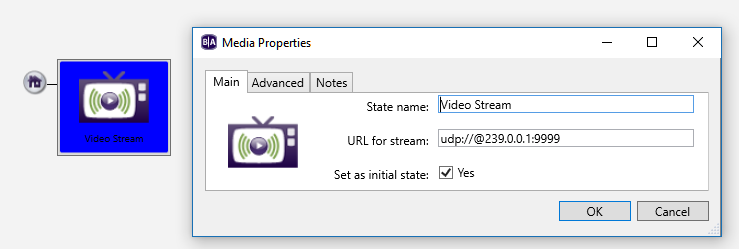
Set the URL for stream to udp://@239.0.0.1:9999
Change the IP if you did in OBS to match. Also please note the addition of the @ symbol, this is important that it be here for the BrightSign URL, but do not put this in the OBS URL.
Publish to your players, and the stream should show up if you are Recording in OBS.
If you have any questions, please ask, I will try and answer if I can. I think I covered all the important items, some things might be slightly different for the mac and linux versions, different video cards or capture devices, etc.
I have this working on a 4K1142 and a XT1143, but should work with any of the BrightSign players that have the Video Stream capability.

